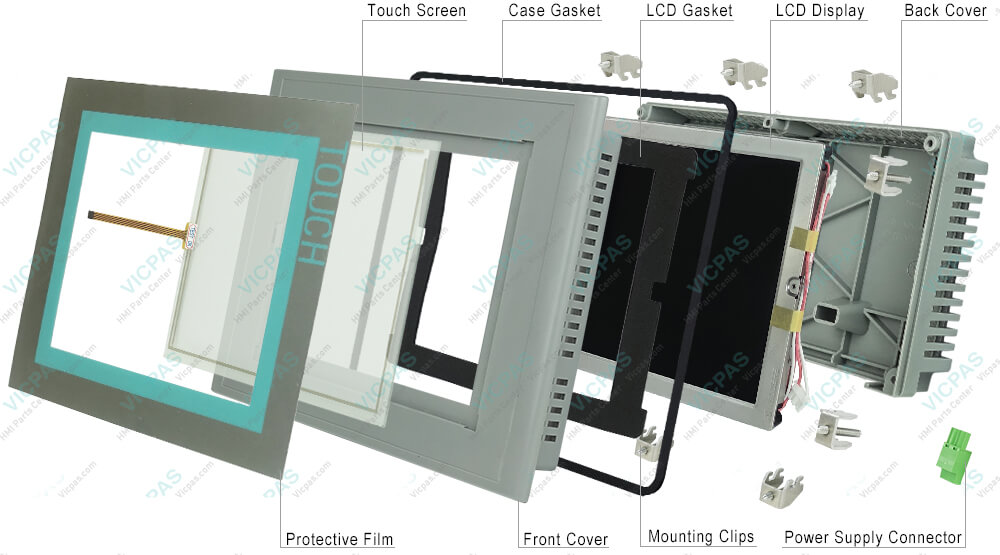
6AV6643-0CB01-1AX5 MP277 8 Touch Repair Kit
- Model
- 6AV6643-0CB01-1AX5
Item specifics
- Brand
- Siemens
- Line
- Multi Panel MP277 8''
- Warranty
- 365 days
- Status
- In Stock
- Size
- 8.4 inch
- Model
- 6AV6643-0CB01-1AX5
- Accessories
- Touchscreen, lcd display, protective film, plastic case
Review
Description
6AV6643-0CB01-1AX5 Siemens MP277 8'' Touchscreen Panel Glass, Protective Film, LCD Display and plastic case for Repair Replacement
Order each part separately is available

The touch screen of the HMI device can be cleaned when it is switched on and a project is running. An operating element must be available in the project with which the clean screen can be called. Once the clean screen is activated, touch screen operation is locked for a configured period of time. The time the touch screen is locked can be set between 5 and 30 seconds. The time remaining for the lockout is indicated by a progress bar.
VICPAS supply 6AV6643-0CB01-1AX5 Siemens MP277 8" touch panel, overlay, LCD display, plastic case, Power Supply Connector, Mounting Clips, Case Gasket, Screws, LCD Gasket, Cable. All of them with VICPAS 365 days warranty and support Urgent Worldwide Shipping.
The HMI device MP 277 8" Touch 6AV6643-0CB01-1AX5 is available in two enclosure models with differentproduct versions. The product version is indicated on the back of the HMI device. SIMATIC MP 277 8" Touch Multi Panel with retentive memory 8" TFT display 6 MB configuration memory configurable with WinCC flexible 2005 Standard SP1.
Specifications:
The table below describes the parameters of the 6AV6643-0CB01-1AX5 Siemens MP277 HMI Parts.
| Part Number : | 6AV6643-0CB01-1AX5 |
| Screen diagonal: | 8.4 in |
| Design of display: | TFT |
| Warranty: | 365 days Warranty |
| Product Line: | Siemens MP277 8 |
| Active power input, typ.: | 12 W |
| MTBF backlighting (at 25 °C): | 50 000 h |
| Number of colors: | 65 536 |
| Mounting position: | vertical |
| Type of supply voltage | DC |
Related Simatic MP277 8 Part No. :
| Siemens Multi Panel MP277 8 | Description | Inventory status |
| 6AV6643-0CB01-1AX0 | MP277 8" TOUCH | In Stock |
| 6AV6643-0CB01-1AX1 | SIMATIC MP 277 8" TOUCH | Available Now |
| 6AV6643-0CB01-1AX2 | SIMATIC MP 277 8" TOUCH | In Stock |
| 6AV6643-0CB01-1AX5 | MP 277 8 | In Stock |
| 6AV6643-5CB00-0ND1 | SIMATIC MP 277 8" Touch Multi Panel | In Stock |
| 6AV6643-5CB10-0HW0 | SIMATIC MP 277 8″ TOUCH MULTI PANEL | Available Now |
| 6AV6652-3MB01-0AA0 | SIMATIC Multi Panel MP277-8 | Available Now |
| 6AV6652-3MC01-1AA0 | SIMATIC MP277-8 | Available Now |
| SIMATIC Multi Panel | Description | Inventory status |
Siemens MP277 HMI Manuals PDF Download:
FAQ:
Question: How to setting the Siemens MP277-8 HMI 6AV6643-0CB01-1AX5's Date and Time?
Answer:
1. Select the appropriate time zone for the HMI device in the "Time Zone" selection box.
2. Touch the "Apply" button to confirm your entry.The time of day shown in the "Current Time" field is adjusted correspondingly to the selected time zone.
3. Set the date in the selection box.
4. Set the current time of day in the "Current Time" text box.
5. If you want to switch from standard time to daylight saving time, select the "Daylight saving time currently in effect" check box.When you press the "Apply" button, the time is brought forward by one hour.
6. If you want to switch from daylight saving time to standard time, deactivate the "Daylight saving time currently in effect" check box.When you press the "Apply" button, the time is brought back by one hour.
7. Confirm your entries.The dialog box closes.The settings for the date and time of day have now been changed.
Question: What is the 6AV6643-0CB01-1AX5 Siemens MP277 HMI parts price?
Answer: Submit a fast quote, send VICPAS an email for best price.
Question: How to change MP 277 8" 6AV6643-0CB01-1AX5 E-mail Setting?
Answer:You have opened the "WinCC Internet Settings" dialog box with the "WinCC Internet Settings" icon.
1. Specify the SMTP server. – Select the "Use the default of the project file" option button if you want to use the SMTP server configured in the project. – Deactivate the "Use the default of the project file" option button if you do not want to use the SMTP server configured in the project. – Specify the required SMTP server.
2. Enter the name for the sender in the "Name of sender" text box.
3. Enter the e-mail account for your e-mail in the "E-mail address of sender" text box. Some e-mail providers only allow you to send mail if you specify the e-mail account. The "E-mail address of sender" text box can remain empty if your e-mail provider allows you to send mail without checking the account.
4. If you want to save the e-mail settings, press the "Advanced" button.
5. Confirm your entries.
The dialog box closes.
The e-mail settings have been changed.
Common misspellings:
6AV66430CB01-1AX56AV6643-0CB0-1AX5
6AV6643-0C0B1-1AX5
6AV6643-0CB01-1XA5
6AV6643-00CB01-1AX5
6AV6643-0CB01-11AX5


