IPC477D PRO 6AV7250-3CD07-0PA0 Touch Screen Display Repair
- Model
- 6AV7250-3CD07-0PA0
Item specifics
- Touch screen panel type
- Capacitive touch screen
- Size
- 15.6 inch
- Warranty
- 365 Days
- Shipping
- 2-4 workdays
- Brand
- Siemens
- Supply Parts
- Touch Digitizer Glass
- Part Number
- 6AV72503CD070PA0
- Product Line
- SIMATIC IPC477D PRO
Review
Description
SIMATIC IPC477D PRO 6AV7250-3CD07-0PA0 Touch Digitizer Glass Replacement Repair

VICPAS presents a comprehensive assortment of top-grade accessories tailored specifically for the SIMATIC IPC 477D PRO 6AV72503CD070PA0 Touch Panel HMI, addressing the nuanced requirements of industrial automation clients. From resilient 6AV7 250-3CD07-0PA0 Touch Membranes to responsive membrane keypads and safeguarding overlays, VICPAS furnishes components meticulously engineered to seamlessly integrate with the SIMATIC IPC477D PRO HMI, thus ensuring optimal functionality and prolonged usability.
Distinguished by precision engineering and premium-grade materials, VICPAS accessories for the SIMATIC IPC 477D PRO HMI epitomize durability and reliability, even in the most demanding industrial settings. Whether it's refreshing an aging 6AV7 250-3CD07-0PA0 MMI Touch Screen, enhancing tactile responsiveness with a new keypad, or fortifying against wear and tear with a protective overlay, VICPAS empowers clients with solutions that augment the performance and longevity of their HMI devices.
With VICPAS accessories 6AV7250-3CD07-0PA0 Touch Membrane at their disposal, clients can confidently fine-tune the capabilities of their SIMATIC IPC 477D PRO HMI, extending its operational lifespan and mitigating downtime, thereby amplifying productivity and efficiency across industrial endeavors. VICPAS stands as a trusted ally, delivering accessories that uphold the highest benchmarks of quality, dependability, and performance, ensuring seamless functionality and sustained operational excellence for SIMATIC IPC477D PRO HMI units over the long haul.
Specifications:
The table below describes the parameters of the Siemens IPC477D PRO 6AV7 250-3CD07-0PA0 Touch Screen.
| Product Line: | SIMATIC IPC 477D PRO |
| Warranty: | 12 Months |
| Response Time: | ≤5ms |
| Brand: | Simens |
| Resolution: | 1366 x 768 Pixels |
| Storage Temperature: | -20℃~+70℃ |
| Contrast Ratio: | 1000:1 |
| Operation Temperature: | -10℃~+60℃ |
| Mounting Position | Vertical |
| Protection Grade: | IP65 |
Related Siemens IPC477 Series HMI Part No. :
| SIEMENS IPC477 HMI | Description | Inventory status |
| 6AV7241-1WA05-0FA0 | SIMATIC IPC 477E Series Touch Screen Monitor | In Stock |
| 6AV7241-1WA07-0FA0 | SIEMENS IPC 477E Series MMI Touch Screen Repair | Available Now |
| 6AV7241-3WB57-0DA0 | SIMATIC IPC 477E Series Touch Digitizer Replacement | In Stock |
| 6AV7241-5WG07-0FA0 | SIMATIC IPC 477E Series Touch Screen Replacement | Available Now |
| 6AV7250-3BC06-0HA0 | SIMATIC IPC 477D PRO Touch Panel Replacement | In Stock |
| 6AV7250-3BC06-0PA0 | SIEMENS IPC477D PRO Touch Digitizer Glass Repair | Available Now |
| 6AV7250-3BC07-0HA0 | SIMATIC IPC 477D PRO Touch Screen Glass Repair | In Stock |
| 6AV7250-3CC07-0HA0 | SIMATIC IPC477D PRO Touch Screen Panel Replacement | Available Now |
| 6AV7250-3CD07-0PA0 | SIEMENS IPC 477D PRO Touch Membrane Repair Replacement | In Stock |
| 6AV7250-6CC07-0HA0 | SIMATIC IPC477D PRO Touch Glass Replacement | Available Now |
| SIMATIC IPC 477 HMI | Description | Inventory status |
SIMATIC IPC477 Series Manuals PDF Download:
FAQ:
Question: What is the size of 6AV72503CD070PA0 Touch Membrane?
Answer: 6AV7250-3CD07-0PA0 HMI Panel Glass is 15 inches.
Question: How to clean the Device Front?
Answer: The device is designed for low-maintenance operation. You should still clean the device front regularly, however.

Cleaning Agents

Procedure
1. Switch off the device.
2. Dampen the cleaning cloth.
3. Clean the enclosure surface with the cleaning cloth and make sure that no water enters the device.
4. Clean the device with the cleaning cloth.
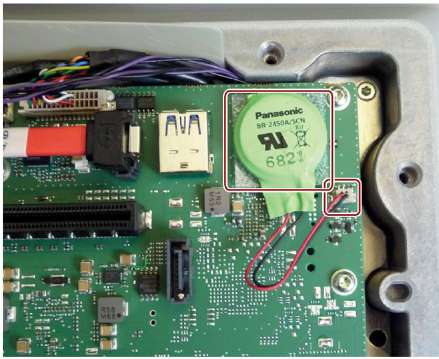
Question: How to replace the backup battery?
Answer:
Requirements
• The device is disconnected from the power supply.
• The power supply connector is pulled out.
• The device is open, see the section "Opening and closing the backplane cover".
• A replacement battery is included
Procedure


1. Remove the labeled connector.
2. The battery is fastened with a Velcro fastener.
Grip the labeled battery and carefully pull it out.

For installation, proceed in the reverse order and reconnect the device.
Common misspellings:
AV7205-3CD07-0PA0
6AV7250-3CD077-0PA0
6AV725-3CD07-00PA0
6AV7250-3CD07-P0A0
6AV720-53CD07-0PA0


