MTP1000 Unified Comfort 6AV2128-3KB36-0AX0 Touch Screen
- Model
- 6AV2128-3KB36-0AX0
Item specifics
- Brand
- Siemens
- Size
- 10.1 inch
- Warranty
- 365 Days
- Product Line
- SIMATIC HMI Unified Comfort Panels Standard Series
- Supply
- 6AV21283KB360AX0 Touch Screen Protective Film
- Part Number
- 6AV2 128-3KB36-0AX0
- Part Number
- 6AV2128-3KB36-0AX0
- Shipping
- 2-4 workdays
Review
Description
SIMATIC HMI Unified Comfort Panels 6AV2128-3KB36-0AX0 Touch Panel Front Overlay Replacement
Order each part separately is available

Ease operation with Multitouch
Operation by smartphone sets the standard: Multitouch technology makes controlling the 6AV2128-3KB36-0AX0 Touch Panel Protective Film Unified Comfort Panels both easy and elegant, combining maximum usability with high-contrast colors and great readability.
Web Client for Remote Operation
The maintenance-free web client provides flexible remote access to the visualization, independent from the on-site operation at the 6AV21283KB360AX0 Protective Film Touchscreen Panel device. It can be accessed via web browser without additional software.
Siemens Industrial Edge-enabled
The new SIMATIC 6AV2 128-3KB36-0AX0 Front Overlay Touch Digitizer Glass HMI Unified Comfort Panels are Edge-enabled. This opens up completely new possibilities, such as functional expansion by using apps and the processing and analysis of data directly at the machine.
VICPAS supplies MTP1000 Simatic HMI Unified Comfort Panels 6AV2 128-3KB36-0AX0 Front Overlay and Touch Panel with 365 days warranty and support Urgent Worldwide Shipping.
Specifications:
The table below describes the parameters of the Siemens 6AV21283KB360AX0 Touch Screen Monitor Front Overlay HMI Parts.
| Ambient Humidity: | 10 to 90 % RH |
| Display Resolution: | 1280 x 800 pixels |
| Part Number: | 6AV2128-3KB36-0AX0 |
| Product Line: | HMI Unified Comfort Panels |
| Touch Size: | 10.1" |
| Brand: | Siemens |
| Display Type: | TFT Color LCD |
| Power supply: | 24 V DC |
| Storage Temperature: | -20°C (-4°F) to 60°C (140°F) |
| Warranty: | 365 Days |
Related SIMATIC HMI Unified Comfort Panels Series HMI Part No. :
| Unified Comfort Panel | Description | Inventory status |
| 6AV2128-3GB06-0AP0 | SIMATIC HMI MTP700 Unified Comfort Touch Membrane Repair | In Stock |
| 6AV2128-3GB06-0AX0 | SIMATIC HMI Unified Comfort Panels Series Touch Glass Repair | In Stock |
| 6AV2128-3GB06-0AX1 | SIMATIC HMI Unified Comfort Panels Series Touch Digitizer Glass Repair | Available Now |
| 6AV2128-3GB36-0AX0 | SIMATIC HMI MTP700 Unified Comfort HMI Panel Glass Replacement | Available Now |
| 6AV2128-3GB36-0AX1 | SIMATIC HMI Unified Comfort Panels Series Touch Screen Monitor | In Stock |
| 6AV2128-3KB06-0AP0 | SIMATIC HMI Unified Comfort Panels Series MMI Touch Screen Replacement | In Stock |
| 6AV2128-3KB06-0AX0 | SIMATIC HMI Unified Comfort Panels Series HMI Touch Screen Panel | Available Now |
| 6AV2128-3KB06-0AX1 | SIMATIC HMI Unified Comfort Panels Series Touchscreen Repair | In Stock |
| 6AV2128-3KB36-0AX0 | SIMATIC HMI Unified Comfort Panels Series HMI Touch Screen Glass | Available Now |
| 6AV2128-3KB36-0AX1 | SIMATIC HMI Unified Comfort Panels Series Touch Digitizer Repair | In Stock |
| 6AV2128-3MB06-0AP0 | SIMATIC HMI MTP1200 Unified Comfort Series Touch Screen Replacement | In Stock |
| 6AV2128-3MB06-0AX0 | SIMATIC HMI MTP1200 Unified Comfort Series Touch Panel Repair | In Stock |
| 6AV2128-3MB06-0AX1 | SIMATIC HMI MTP1200 Unified Comfort Touch Membrane Repair | Available Now |
| 6AV2128-3MB36-0AX0 | SIMATIC HMI Unified Comfort Panels Series HMI Panel Glass Repair | In Stock |
| 6AV2128-3MB36-0AX1 | SIMATIC HMI Unified Comfort Panels Series Touch Digitizer Glass | Available Now |
| SIMATIC MTP HMI | Description | Inventory status |
SIMATIC HMI Unified Comfort Panels Series HMI Manuals PDF Download:
FAQ:
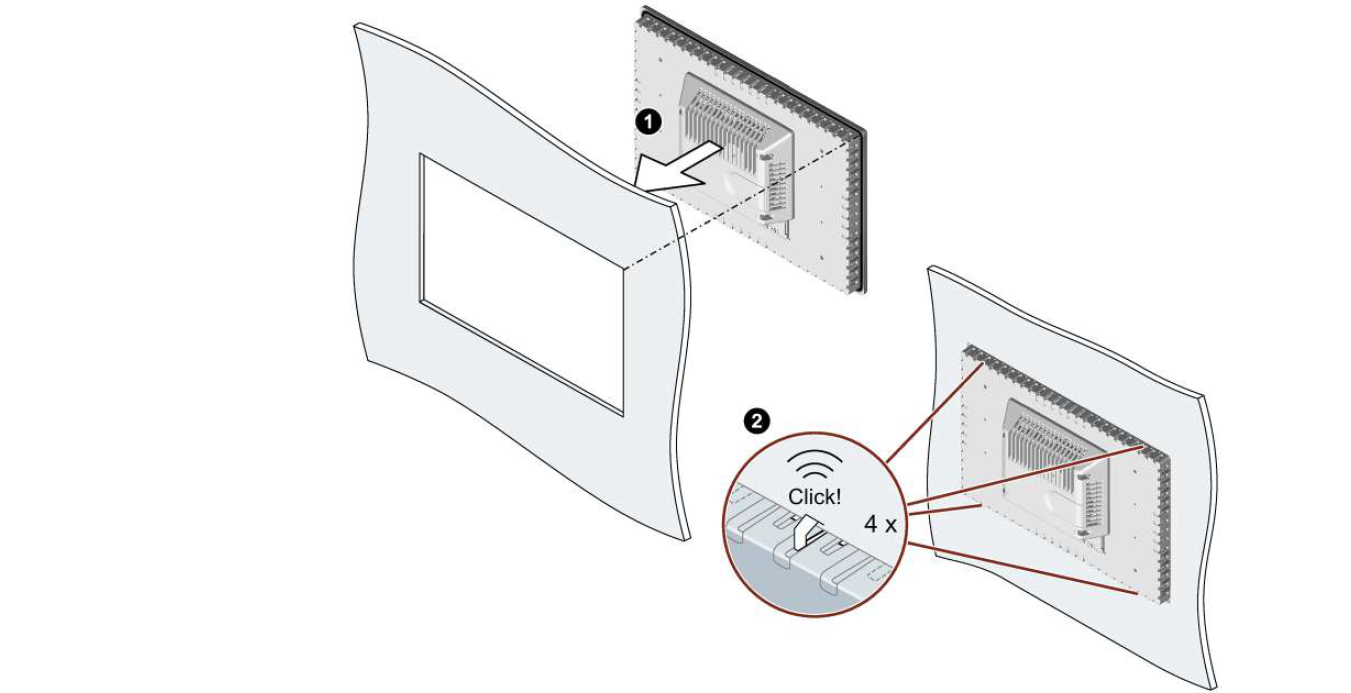
Question: How to fastening the 6AV2128-3KB36-0AX0 built-in device with mounting clips?
Solution:

1. Insert the device into the mounting cutout from the front.

2. Make sure that all four spring locks on the top and bottom of the device fully engage. If necessary, gently press the device into the recess if it is not fully engaged.
3. Insert a mounting clip into the cutout provided on the device. Make sure it is in the correct position.

4. To secure the mounting clip, tighten the grub screw with the slot screwdriver, torque 0.5 Nm.
5. Repeat step 3 and 4 for all mounting clamps until all clamps are fastened.
6. Check the fit of the mounting seal.
Common misspellings:
6AV2128-3KB36-0X0AV2128-3KB36-0AX0
6AV21283-KB36-0AX0
6AV2128-3K836-0AX0
6AV2128-3KB36--0AX0


