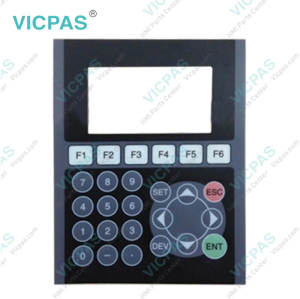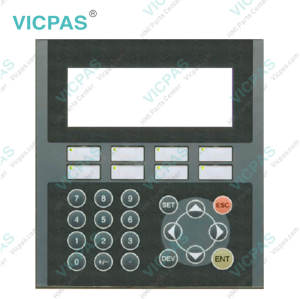
F920GOT-BBD5-K-E GOT900 Membrane Keyboard Keypad
- Model
- F920GOT-BBD5-K-E
Item specifics
- Brand
- Mitsubishi
- Warranty
- 365 Days
- Product Line
- Mitsubishi GOT-F900 F920GOT-K series
- Supply
- F920GOT-BBD5-K-E Membrane Keypad Switch
- Size
- 3 inch
- Model
- F920GOT-BBD5-K-E
Review
Description
Mitsubishi GOT-F900 F920GOT-K series HMI F920GOT-BBD5-K-E HMI Membrane Keyboard Keypad Repair Kit.

The Mitsubishi F920GOT-K series HMI F920GOT-BBD5-K-E Membrane Keyboard Keypad uses SQL statements to directly transmit data from the connected industrial devices to a database server. The communication with the database is configured in GT Works3 without any programming. There is no need for a gateway computer or complex programming to communicate with the MES database server.
Connect the GOT-F900 F920GOT-K FF920GOT-BBD5-K-E to the programming port of the FX Series PLC. Program transfer and monitoring are available in the GOT-F900 Series using the built-in two-port interface function through connection of a personal computer to the RS-232C port. (In the Handy GOT, the rear cover would have to be open.) When connecting the FREQROL Series inverter, check the COM port designation, the OS version of the GOT-F900, and the applicable versions of the screen creation software.
During the servo amplifier/test operation, when the communication between the GOT-F900 F920GOT-K F920GOT-BBD5-K-E and the servo amplifier is interrupted for 0.5[ms] or more, the servo amplifier decelerates, stops, and then gets into the servo lock status. During the servo amplifier/test operation, continue the communication constantly by monitoring the status display of the servo amplifier on the GOT-F900 F920GOT-BBD5-K-E screen, etc.
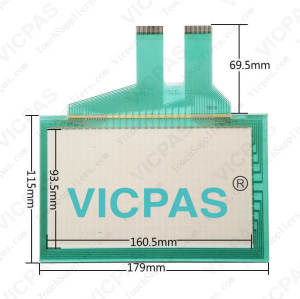
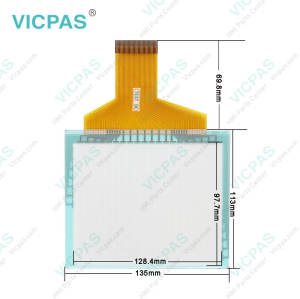
Specifications:
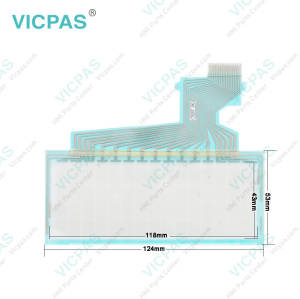
The table below describes the parameters of the F920GOT-BBD5-K-E Mitsubishi F920GOT-K Membrane Keypad Switch.
| Part Number: | F920GOT-BBD5-K-E |
| Display device: | STN monochrome LCD |
| Screen diagonal: | 3 in |
| Warranty: | 365 Days |
| Product Line: | Mitsubishi F920GOT-K Series |
| Input Power: | 24VDC (+10%, -15%) |
| Operating Temperature: | 0 to 55°C |
| Resolution: | 240 x 80 dot |
| Storage Temperature: | -20°C to 60°C |
| Cooling Method: | Self-cooling |
Related Mitsubishi F920GOT-K Series Part No. :
| Mitsubishi GOT-F900 | Description | Inventory status |
| F920GOT-BBD5-K | Mitsubishi GOT-F900 Membrane Keyboard Keypad Repair | In Stock |
| F920GOT-BBD5-K-C | Membrane Keyboard Mitsubishi GOT900 F920GOT-K | Available Now |
| F920GOT-BBD5-K-E | Mitsubishi F920GOT-K Membrane Keypad Switch | In Stock |
| F920GOT-BBD-K | Mitsubishi F920GOT-K Operator Panel Keypad Repair | In Stock |
| F920GOT-BBD-K-C | Mitsubishi F920GOT-K Keyboard Membrane Replacement | In Stock |
| F920GOT-BBD-K-E | Keypad Membrane GOT-F900 F920GOT-K Replacement | Available Now |
| Mitsubishi F920GOT-K HMI | Description | Inventory status |
Mitsubishi GOT-F900 Series HMI Manuals PDF Download:
FAQ:
Question: What is the size of F920GOT-BBD5-K-E Operator Keyboard?
Answer: The Mitsubishi GOT-F900 F920GOT-K F920GOT-BBD5-K-E Operator Keyboard is 3-inch.
Question: How to replace the backlight of Mitsubishi GOT-F900 F920GOT-BBD5-K-E Terminal?
Answer: Replace the backlight (spare part) using the following procedure.
The backlight is not required to be replaced because it is the LED type.
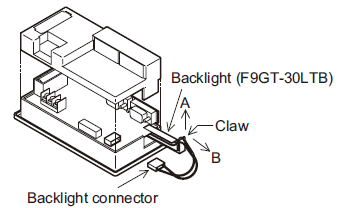
2) F930GOT and F933GOT
Insert and install the CF card into the CF card interface with its front side outside.
a) Turn off the power.
b) While pressing claws at the four corners, move upward the rear cover.
c) Disconnect the backlight connector.
d) While pressing the claw of the backlight, move upward the backlight in the direction A by approximately 10mm (0.39").
e) Pull out the backlight in the direction B, then install a new backlight.
f) Accommodate the new backlight in the order "4)→3)→2)" which is reverse of the order above.
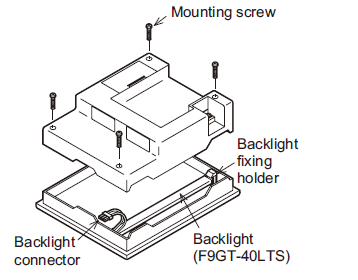
3) F940GOT and F943GOT
a) Turn off the power.
b) Remove mounting screws at the four corners
c) Slowly remove the rear cover.
Caution: If the rear cover is pulled with an excessive force, the cable connecting the rear cover may be disconnected, or the PCB may be damaged. Be careful.
d) Disconnect the backlight connector.
e) Remove the backlight F9GT-40LTS from the backlight fixing holder.
The backlight can be removed easily by inserting a screwdriver into the holder.
f) Install a new backlight F9GT-40LTS.
g) Accommodate the new backlight in the order "4)→3)→2)" which is reverse of the order above.
4) F930GOT-K, F940WGOT and Handy GOT
For replacement of the backlight or the LCD, consult with the Mitsubishi distributor nearest to your company.
Common misspellings:
F920GOT-BBD5--EF920GOT-BD5-K-E
F92G0OT-BBD5-K-E
F920GOT-8BD5-K-E
F920GOT-BBD5-K--E