
3HAC12929-1/10 FlexPendant Parts Touch Keypad Display Repair
- Model
- 3HAC12929-10
Item specifics
- Warranty
- 365 Days
- Size
- 7.5 inch
- Brand
- VICPAS
- Model
- 3HAC12929-1
- Supply
- Teach Pendant Parts
Review
Description
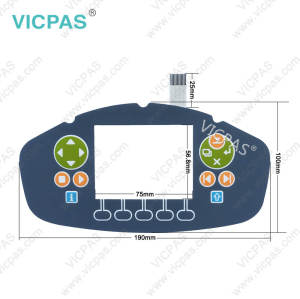
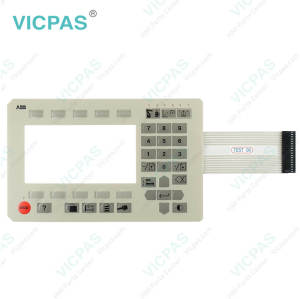
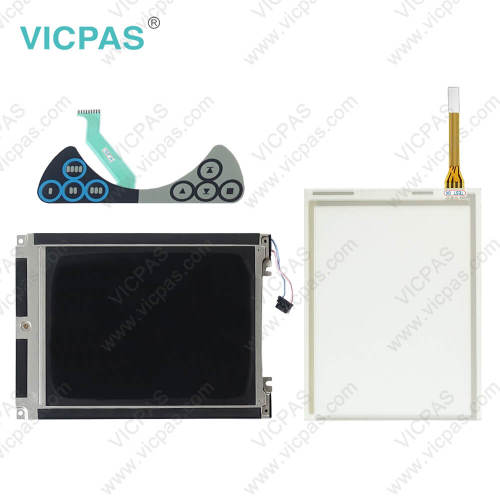
3HAC12929-1 3HAC12929-10 IRC5 Teach Pendant touch screen panel keypad switch LCD display Plastic Case replacement repair
Order each part separately is available

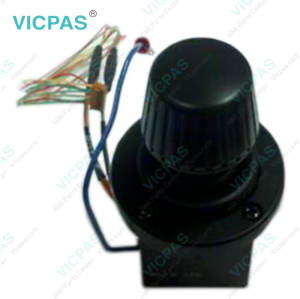
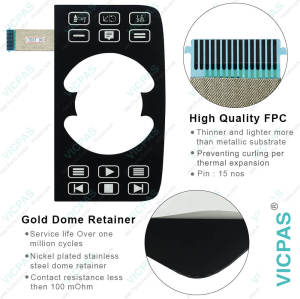
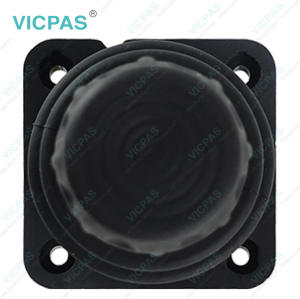
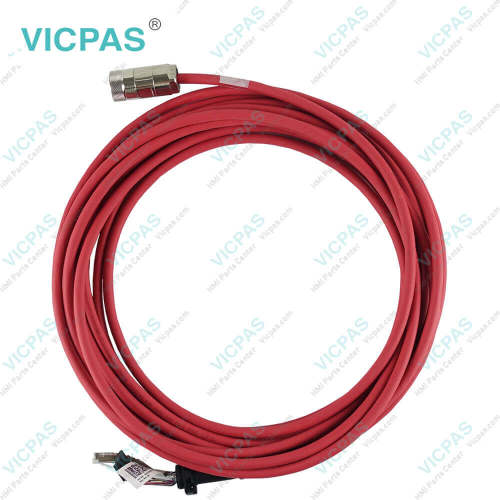
The BA teach pendant parts, touch screen, E-stop button cover, joystick, cable, hand strap, LCD display, screws, membrane keypad, enable switch cover, connector cover, front case, Emergency Stop Switch, LCD Display Bracket, Joystick Connection Cable, Touchscreen Bracket, PET Screen Protector, Main Board, Emergency Stop Contact and back cover are used to repair 3HAC12929-1 3HAC12929-10 Teach Pendant controller panels.
VICPAS supplied BA Programming Pendant part to replace, make the teach pendant running. We provide a 1-year warranty of the most product, which include most of enable switch cover, connector cover, touch panel, E-stop button cover, joystick, cable, hand strap, membrane keyboard, LCD screen, screws, Emergency Stop, Joystick Connection Cable, Touchscreen Bracket, PET Screen Protector, Main Board, LCD Display Bracket and protective case shell housing.
The benefits of 3HAC12929-1 3HAC12929-10 LCD display panel terminal keypad enable switch cover HMI touch screen cable hand strap connector cover joystick plastic case E-stop button cover screws teach ipendant. Integrated help and diagnostics provide instant help to recover from production interruptions. Online help menus are available for every iPendant function. These are an optimized version of the information that is available in the standard robot documentation set.
Product Video:
The video below describes the product details of the 3HAC12929-1 3HAC12929-10 Teach Pendant parts, include touch screen glass, joystick, screws, enable switch cover, connector cover, E-stop button cover, cable, hand strap, membrane Keypad, LCD display, Emergency Stop Contact and protective housing Case(shell).
Specifications:
The table below describes the parameters of the 3HAC12929-1 3HAC12929-10 teach pendant.
| Part Number : | 3HAC12929-1/10 |
| Product Line: | IRC5 KEBA Sx TPU 2 |
| Type Designation: | 38x34x22 |
| Warranty: | 1-Year Warranty |
| Touchscreen: | 6.5” colour LCD |
| Software Features: | Supports HTML 3.2/Javascript 1.1 |
| Language: | Worldwide |
| Key Features: | Touch screen support |
| Hardware Features: | CE Mark available |
| Input Type: | ≥100.000 times |
Related BA Teach Pendant Part No. :
| Teach Pendant | Description | Inventory status |
| 3HAC023195-001 | BA Teach Pendant IRC5 Sx TPU 2 Repair | In Stock |
| 3HAC023195-001/03 | BA IRC5 Sx TPU 2 Flexpendant Replacement | Available Now |
| 3HAC023195-001/04 | BA Teach Pendant IRC5 Sx TPU 2 Repair | In Stock |
| 3HAC023195-006 | BA IRC5 Sx TPU 2 Flexpendant Replacement | In Stock |
| 3HAC12929-1 | BA Teach Pendant IRC5 Sx TPU 2 Repair | Available Now |
| 3HAC12929-1/03 | BA IRC5 Sx TPU 2 Flexpendant Replacement | In Stock |
| 3HAC12929-1/04 | BA Teach Pendant IRC5 Sx TPU 2 Repair | Available Now |
| 3HAC12929-10 | BA IRC5 Sx TPU 2 Flexpendant Replacement | In Stock |
| AMT98662 | 7.7 inch AMT Touch Screen Panel Origin Repair | Available Now |
| JC2000-0049 | Joystick for IRC5 Sx TPU 2 | In Stock |
| KCG075VG2BE-G00 | LCD Display for BA Teach Pendant Repair | In Stock |
| Keba Sxtpu2 cable 10m 70631 | BA Sx TPU2 Cable 10m | In Stock |
| LM8V302 | Sharp LCD Display for BA Teach Pendant Repair | In Stock |
| BA Flexpendant | Description | Inventory status |
Teach Pendant Manuals PDF Download:
FAQ:
Question: How to mount the FlexPendant holder?
Answer:
1. Remove the protective liner from the tape.
2. Press the mounting plate with FlexPendant holder against the surface where it should be mounted.
Question: How to remove the axis computer?
Answer:
1. Remove the five feet from the cabinet.
2. Assemble the mounting brackets.
3. Fit the right, left and middle mounting brackets in the 19 inch cabinet.
4. Insert the IRC5 Compact in the 19 inch cabinet so that the latches fit in the recesses in the back of the mounting brackets. Fasten the IRC5 Compact to the mounting brackets with the attachment screws.
Common misspellings:
HAC12929-1
3AC12929-1
3HC12929-1
3HA12929-10
3HAC12929-10